Sunday, 2 November 2014

Melting acrylic wool

This sample piece was one of my biggest experiments I have done for this project and during my time at college. I decided for this piece I wanted to flatten my knitting with the heat press so the knitting was flatter to print onto with pigment inks. 

I then went to heat press my piece thinking it would flatten it only to get a shock when lifting the mat up on the heat press to find the knitting melting and sticking to the mat. I quickly pealed the knitting off before it had time to stick to the mat and put it on the side to cool.

After this I spoke to my tutor about it and found that it had happened because I had used acrylic wool (man made wool) and because of this when heated over 500 Fahrenheit it melts. It also melts and shrinks away from a flame or heat.

Melted Knitting

You can see the knitting stitches on the top of the melted piece however on the bottom it has melted smooth. I do not think the screen print would have worked on this piece so I decided to experiment with it some more.

Close up of melted knitting

Piece after using heat gun

The heat gun made the full piece wavy, It created bigger holes with browning edges and gave it more texture.

Piece once finished

I then used a solder to create some smaller holes and did more with the heat gun. It was definitely a experience for me and put me completely out of my comfort zone. It was funny to do and I think although it turned out well it looks like a slice of cheese. I also did some more experimental pieces as seen below:  

Joining two strands together

Singular springs

Double colour springs in a figure 8

Single colour springs in a figure 8

These pieces were made using a heat gun and two metal needles. I have wrapped the acrylic wool around one or two needles with one or two strands of wool and then heated with the heat gun. This then makes the wool a bit like a spring. I love these pieces as they are simple, different and effective and I will hopefully use them in my final pieces.

Screen printing Samples

These are some of my screen printing samples that I have made before my final pieces. They are made on a range of materials and done with a few colours of pigment ink.

Three samples on cotton
in a singular colour

One print on cotton
 in two colours

One print on calico heavy
in three colours

One print on cartridge paper
in two colours 

The print above was a accidental piece that made. I had printed both prints onto my piece but on the last one forgot to take the paper from underneath my screen this resulted in the print getting stuck to the screen. Then having not noticed I took my screen to the wash out room where I began to wash my screen with the pressure washer. Once I realized I hadn't removed the print it was too late. I removed the print from the screen to find that colours had run or faded in some places. My class mates and tutor decided that it was really good as it looked like I had used soft pastel to create the effect. I love that it turned out well and believe it to be one of my best and favorite prints.

One print on card in 
three colours

Unfinished print on watercolour
paper in one colour

This print is one of the few that smudged when using my first screen. There are many reasons this could have happened like the screen moved, I pulled the squeegee over too many times, I lifted the screen up and moved it wrong or pealed the print off wrong. I did try to fix this by putting weights on the screen, pulling the squeegee over once, using bigger sized paper, taping the print to the table and being more careful when getting the print off. This did eventually work and I was able to continue with my samples and learn from my mistakes. 

One print on black paper
in one colour

This print didn't show up as well and you can only see the shine of the colour. The ink only shows up on a surface lighter than the colour you are using this is why it hasn't shown up as well.

One print on tissue paper
in one colour

One print on my weave looming done
in three colours

One print done on my wet felting
in three colours

One print on card in two
colours

One print on watercolour paper
in two colours

One print on card on a square piece
in two colours

Although some pieces went wrong I am very happy with what I have produced and look forward to doing more pieces like these.

Knitting - Increasing and decreasing stitches

Hey everyone ;-) This is a quick post on decreasing and increasing stitches in knitting.

First for increasing stitches you knit the stitch as normal leaving the original stitch on your left needle and then knit a stitch into the back of that stitch. This then creates two stitches from one stitch.

Then for decreasing stitches you go into the bottom of two stitches and knit a stitch as normal. This then takes two stitches down to one stitch. Below is a YouTube video of both techniques:


Increase and decrease stitches

Below are my own samples of this technique:

My increase and decrease sample

My increase and decrease sample 2

This sample that I have done started with four stitches and went up to fourteen and then down to four again. It is really simple when you know how to do it and it is a good way to form shapes if you wish to make a jumper etc. Thanks for reading x

Needle felting

Hi guys! This is my post on needle felting that I have recently learnt at college.

What you will need:

Felting needles
Needle tool/handle
Foam mat
Felt
Wool

 First the health and safety for needle felting the needles are very sharp so make sure they are always stuck in the foam mat when your not using it. When pulling the needle out of the handle don't pull your fingers down the needle as it will cut you. Finally keep your eyes on what you are doing and don't accidentally stick yourself in the finger with the needle.

Felting needles

Needle tool and foam mat

To needle felt you lay your flat piece of felt that you are working with onto the foam mat. Then taking your wool lay it where you want to needle felt it and then with the needle start stabbing/pushing the fibers through the felt. After this carefully pull the felt piece off the foam mat. This is all you need to do there are also handles that can have multiple needles in so that you can needle felt bigger areas. 

This YouTube video is a quick demonstration of this technique. 

Needle Felting Video

First needle felted piece

This piece I had 15 minutes to do and I was told to do a sunrise as a sample. It was also a way to get comfortable with the technique and experiment with different shapes, blending and sizes of felt. I think my piece went well apart from the fact that some more of the felt fibers needed pushing through the felt to make the image less blurred.

Second needle felted piece

The second needle felted piece was done on top of a wet felted piece the picture above was taken when it was half done. I did then felt a bike on top of this but unfortunately forgot to take a picture. It does look very french and I found that the two techniques work beautifully together if you stick to a theme.

This process is good to use for more solid images and next time I would like the chance to embroider on top of pieces like these. I hope you have enjoyed this post x

Wet felting 2

Hi everyone! This week I have revisited the technique wet felting. I won't be re-telling you about the process as I have already done this on a older post so there is a link below if you wish to see this.

Link to my post called textiles-week 2:

For my own wet felting I took colours and patterns from my sketchbook, mood boards and visual sheets to relate each piece to my work. Below are some images of the wet felting process:

Before felting wool

Before felting wool 2

Felting while its wet

These pieces were very easy to make and each piece felted well. The pieces were not necessarily A5 size as the pieces shrink due to the fibers fusing together this is a concept I need to consider for future pieces. I liked how the patterns and colours turned out and think that they would work well if I wanted to add a second process like embroidery or needle felting. 

Felting pieces once dry

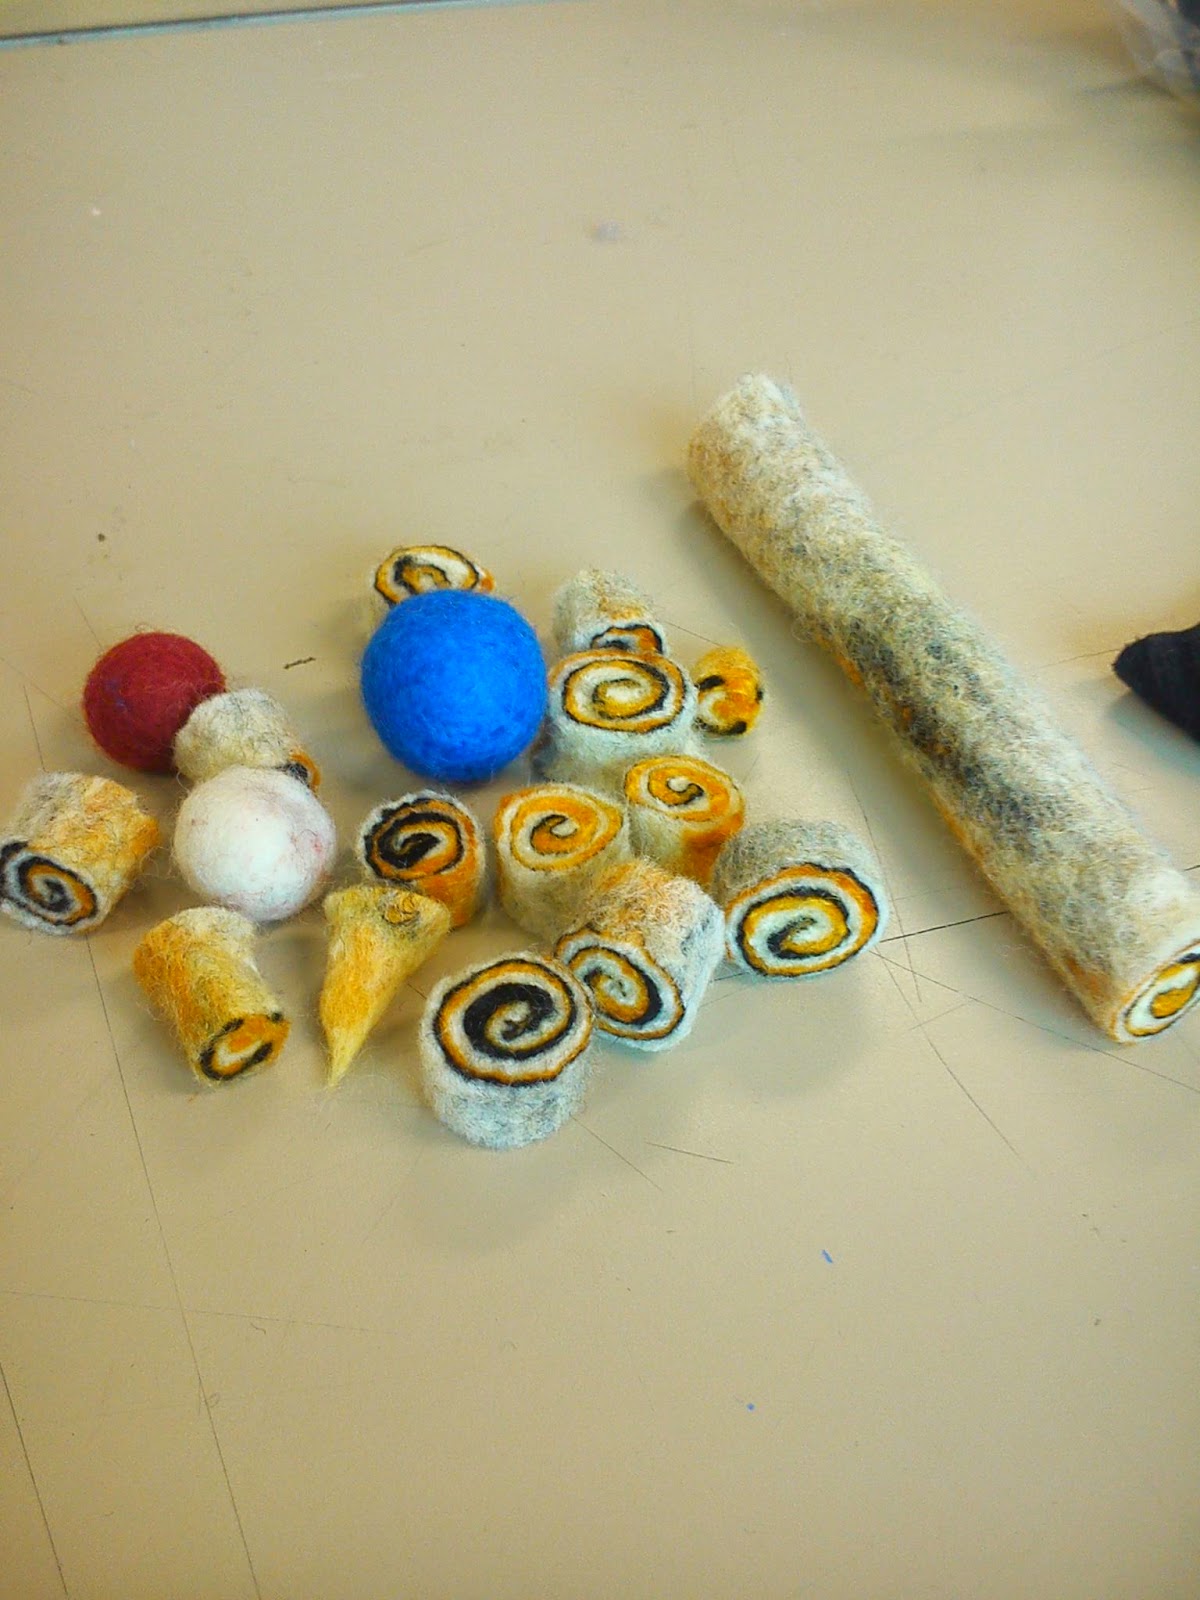
I also experimented with 3D felting making balls and rolls. The balls I made are in the colours of the french flag and the roll was swirled in the colours from a bike wheel.

Felt balls and rolls

These were all my first attempts and they all turned out to be quite good. I managed to get the shapes of the balls to be round and firm and the roll was felted tightly so there were no gaps. I had fun doing these although it tires your arms when rolling or rubbing the felt. It will be great to use within my final pieces. 

Friday, 31 October 2014

Knitting - Knit one purl one rib

This post is on another new knitting stitch called knit one purl one rib that I have focused on to find a flatter stitch that I could possibly print onto. I got taught this stitch by my nanan as she loves knitting and I needed a teacher that would show me how to do new stitches.

This particular stitch was quite easy to learn as I had already learnt how to do the knit stitch and purl stitch (refer back to earlier posts to learn these stitches). It was challenging when trying to alternate between the two stitches but I managed to get the hang of it quite quickly once it was explained and demonstrated a few times. 

Close up of Knit one purl one rib

First for this stitch you cast on, then knit one stitch and purl one stitch until you are at the end of the row remember what stitch you are on so you don't go wrong. Then remembering the last stitch you were on at the end of the row start with that same stitch and continue alternating between those stitches. This is basically all you do until you come to cast off, when casting of you continue with both stitches and do as normal.

You can also tell what stitch you have just done as there will either be a bobble where you have purled or a knit.

Sample - Knit a line purl a line and knit one purl one rib

I found this stitch very useful as it did not curl up at its edges and it also looked very neat. It was easy and therapeutic to do and I will hopefully print on it for a sample piece.

Saturday, 27 September 2014

Knitting - Purl stitch

This blog is about a new stitch I learnt in my knitting lesson called purling. It is a very uncomplicated stitch if you have already learnt how to do the knit stitch (this is also on my blog). I found that it was better to learn the knit stitch first however some may disagree. 

Casting on close-up

First before purling I cast on twenty stitches to start my sample.

Cast on twenty stitches

To purl start by putting the right needle into the top of the first stitch on the left needle making sure you have a X formed with the right needle at the front. Then wrap your wool around the right needle and pull the right needle through the stitch, taking the wrapped around wool with it and then put it onto the right needle. After this keep going until you want to stop purling.

This is a great stitch to use, when I used it the sides of my knitting didn't curl up and it looks nice as well. It is something different and would be good to put pattern in my knitting.

Below is a video of the purl stitch:


After purling five rows I then went on to do knit a line purl a line for about ten lines and then went back to purl five lines. This was a sample and it looked like a piece you could use for a cuff on a jumper.
Purling

I have not yet put a image on of my sample as I forgot to photograph it but it turned out amazingly well and I am really pleased with it. 

On my next blogs I will be doing Knit one, purl one rib and felting so please have a look guys x